Extending the summer camping season into late fall and early spring—and eventually throughout the entire winter—can be as easy as beefing up some of your existing warm-weather camp equipment and skills to keep you safe and comfy throughout your cold-weather camping experience.
Clothing: Your clothing is your first and foremost protection against the elements. Dressing in layers is critical for your health and comfort as temperatures drop. Even in cold weather, your body perspires. Your first layer should wick that moisture away from your skin to outer layers: an insulating mid-layer, and an outer weather-proof shell that enables you to ventilate that moisture to the outside.
Think lightweight, synthetic fabric for the initial “next to your skin” innermost layer; slightly heavier wool/synthetic blends for mid/insulating-heat retention layers; and a rugged, water/wind-proof outer layer (with hood and ventilation openings). It’s best to begin each day fully layered up, adjusting layers during the day based on your level of exertion and changes in your environment.
Thick wool socks are a must, as are boots with liners that can be removed and dried separately from the boot. If you expect to recreate in more extreme temperatures, get a boot about a half size larger to accommodate thicker socks.
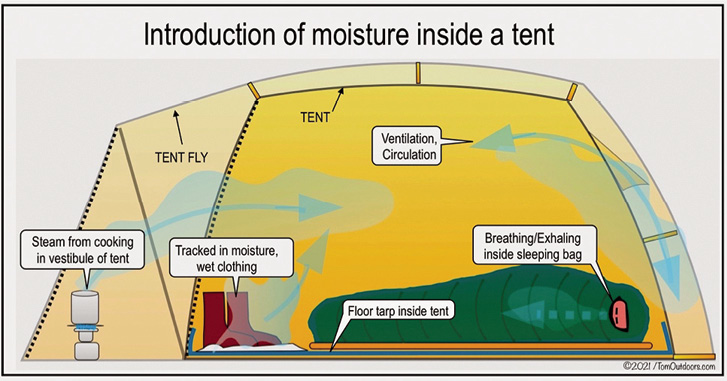
Tent: A good quality designed “three-season” tent should provide adequate protection from the elements throughout all but the coldest deep winter nights. A good tent fly and adequate ventilation is critical to keep moisture at a minimum in your tent—especially important for limiting frost build-up on the inside walls and ceiling.

Minimize moisture build-up by keeping wet clothing out of the tent (snow thawing off boots, etc.) and if you cook in your tent vestibule area, stay as far from the entrance as possible to minimize steam from drifting into your tent.
If you have a choice, pitch your tent in trampled-down snow—its minute air pockets offer good insulation against the cold, bare ground.
Sleeping System: Most “summer” sleeping bags are too light for cold-weather sleeping. Instead, choose lower temperature-rated “three-season” bags, especially designed for extended shoulder season use. For optimum warmth, select a sleeping bag that is rated for at least 10 degrees-F colder temperatures than you expect to encounter. Adding a wool or fleece liner to your current sleeping bag can also add an additional 10 degrees of warmth.
Also, have a pair of long-johns or other “inner layer” type clothing to wear exclusively for sleeping—don’t crawl into your bag wearing your day clothing. If you need to warm up your bag, fill a couple of water bottles with hot water and toss them into the bag a few minutes before you crawl in.
Consider using both an air-filled mattress against the ground for a cushioned sleep and a closed-cell pad between you and the air mattress to add a layer of warming insulation immediately below you.
To keep moisture out of your sleeping bag, don’t be a tortoise and breathe with your head in under the shell of your bag. It’s better to exhale moisture into the open air and use a stocking cap to keep your head warm.

Cooking: Overcoming the challenges of cold-weather cooking requires modifications in the camp kitchen. First and foremost is creating and sustaining a good, heat-producing fire. Initially, a teepee-shaped fire, built with spruce and other soft woods, is easy to start and directs the flame/heat upwards to quickly heat water and provide warmth to your hands. Hardwoods (oak, maple, ash, hickory, etc.) formed into a cross-stacked pile of wood burns longer and hotter and are good for producing hot, glowing embers best suited for cooking—and providing warmth for a longer period of time.
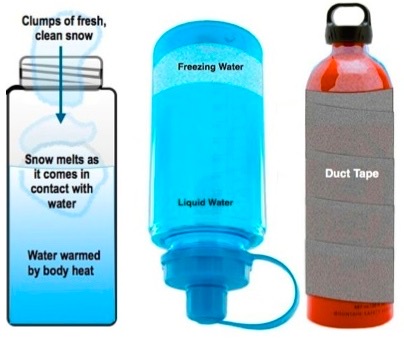
Other camp kitchen and cold-weather tips include using bowls instead of plates to keep food warmer longer, and using wooden utensils that don’t draw heat out of food as fast as metal can. Also, consider one-pot meals, with sauces prepared at home, frozen, and the package then tossed into the water used to boil pasta, rice, etc. Wrap duct tape around metal containers so bare fingers aren’t exposed to the ice ‘burn’ of frozen metal surfaces. Last but not least, stow water bottles upside down as liquid in the vessel freezes from the top down—inverting the bottle keeps the nozzle end ice-free.
Most cold-weather camping tasks are simply modifications of warm-weather routines, just carried out in more challenging conditions and environments. A good way to ease into serious winter camping is to spend a weekend in a camper cabin. You’ll have the luxury of a warm shelter coupled with necessary outdoor activities, allowing you to test your wardrobe, campfire cooking skills, and other warm to colder weather transitions.
Cold-weather camping extends your opportunities to enjoy the great outdoors to the fullest—from those crisp fall or early spring days car camping, to full-blown wintry, cross-country ski or snowshoe expeditions into the backcountry.


